Assignment 4: Sewing HEM Comfort Method
Assignment 4: Sewing Row 1 To The Track
After watching the Sewing Row 1 video begin practicing on your mannequin. Clip-in BOTH practices wefts onto your previously beaded track. Then sew on the wefts as shown in the video.
Once finished, send a picture AS WELL as a video of you completing your work to your mentor labeled as Assignment 6: Sewing the Wefts onto the track.
Tools you will need for this assignment
White Thread
Needles
Metal clips
Instructions
1. Start on the left side and meet the edge of the weft with the edge of the hair of your first beading section. Clip the weft to the string between the first two beads.
2. Continue clipping weft to string along the track, going every few beads in between. The hair may not make it all the way around your client’s head, but continue clipping to the string until the weft ends. On a client, you will have 4-6 wefts all stack on top of one another. For practicing, you will just have one.
3. Pin some clips horizontally to prevent the wefts from sliding down as you stitch.
4. Using another threaded needle, you are now ready to sew!
5. Begin by threading your needle through the client’s hair on the left side of their first bead, ⅛ of an inch in from the start of the weft.
6. Feed the needle going down through the real hair and weft hair until there are 3 inches of thread left behind.
7. Use those 3 inches to tie a triple knot with the rest of the thread.
8. Clip up the remainder of the 3 inches into the bun section.
9. Begin whip stitching to the left by feeding the needle down again through the real hair and weft hair, then up through the loop of thread that has been created.
10. With one hand, pull the real and weft hair taut, while pulling the needle and thread upwards with your other hand, making the knot tie at the top of the weft.
11. Repeat this, stitching to the left, until the weft is anchored and secured to the natural hair. This creates a “backstitch” that you will sew back over again as you make your way to the right.
12. Now, begin sewing to the right.
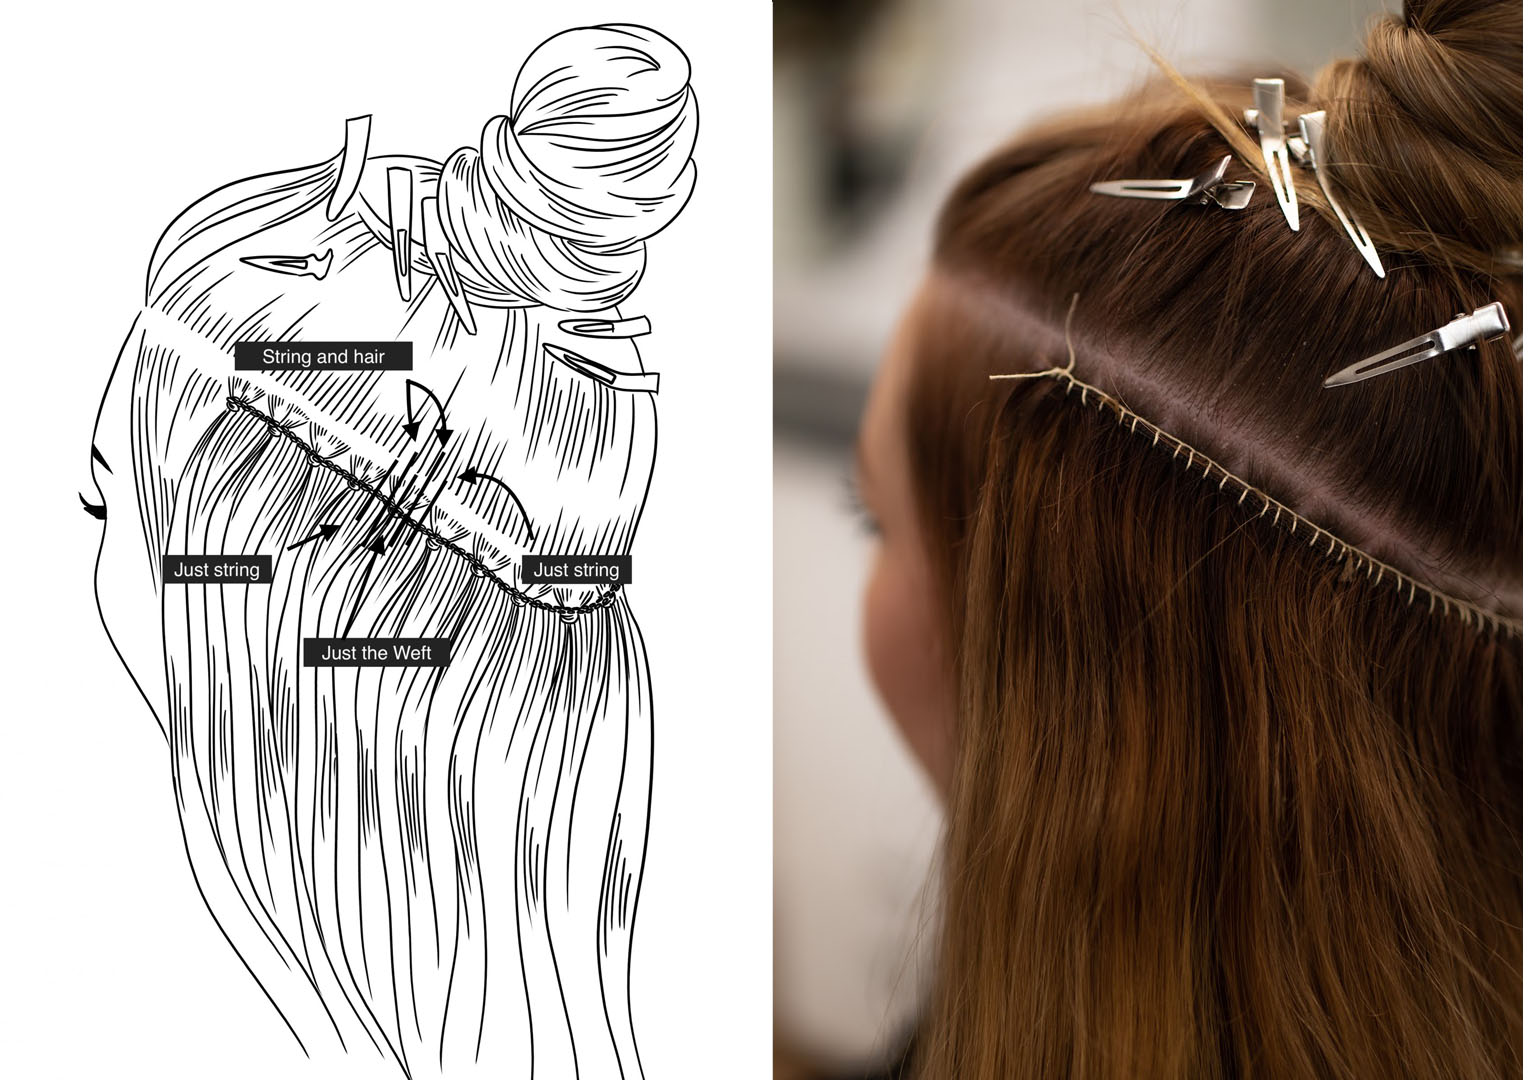
13. Before the bead, feed the needle behind the hair, then up through the loop to create a knot. Then, once you get to the bead, do not go behind the bead. Stitch JUST the weft, So the needle will go between the weft and the bead, grabbing just the weft.
14. To the right of the bead, you will grab hair from the track along with the weft. Feed the needle up through the loop to tie another knot.
15. Remember to pull hair taut and pull thread upwards to keep that knot at the top of the weft.
16. Do another stitch with hair and track, then pull tight.
17. When you get between two beading sections, go behind the track string and come up through the weft sewing just weft and string together.
18. Repeat pattern of two stitches with hair and string before bead, one stitch with just weft above bead, two stitches with hair and string after bead. In between sections, just grab the track string with your stitch.
19. Next, create a stitch to the left of your knot by going through the client’s hair and up through the wefts. Before you pull it all the way through, bring your needle up through the underside of the loop.
20. Pull your string up and to the left to allow the knot of the stitch to lay flat on top of the weft.
21. Run your finger across the beginning of the weft. If it is not flat, create another stitch. Be careful not to do too many in order to keep it as clean looking as possible and eliminate unnecessary bulk. Usually 3-4 is plenty.
22. Once your end is stitched flat, continue stitching to the right now by going through the client’s hair and behind the thread from the track.
23. Bring your needle up through the loop and pull up and to the right to allow the knot of the stitch to lay flat on top of the weft.
How to Submit Your Assignment
- Open up your text message on your phone
- Click into the message thread with your mentor
- Click on the image icon at the bottom right of the screen
- Find image on your phone or take a photo by clicking the camera button
- Click image and it will automatically upload
- Make sure to label each image by sending a message before or after stating which assignment the image is for
If you have more questions check out: https://3cc164e5-ccdb-45a4-a04e-abcc40c10196.cc10.conves.io/how-to/
